
Top Tips on How To Read a Piste Map
8 February 2023
If you are going on your first trip to the mountains are worried about how confusing the piste map looks we have a guide for you with tips on how to read the map so you can enjoy your snowboard or ski trip!
Where to find piste maps:
You can find piste maps in various places, the main places to look out for them is any good tourist information centre, most big lift stations with a ticket office, most hotels and chalet companies will offer them out.
Don’t worry if you lose your map as there will be large maps at the top and bottom of the main lifts to show you where you are. You can always ask someone for help – look for people who work there i.e. the lift attendants, instructors etc
Meaning behind the different lines and symbols:
All resorts will grade their runs to show their difficulty. They range from green = beginner, blue = intermediate, red = advanced and black = expert. All runs will be numbered or named, they will also have poles down the side of the piste which are coloured and numbered to guide you as to where you are and what sort of run you are on. Poles will also identify areas of danger. Some runs might be graded higher as a small section might be harder than the rest of the run therefore upgrading the whole run. Itineraries are a marked but non maintained route that is intended for experienced skiers and snowboarders.
Unfortunately there is little standardisation between resorts when it comes to grading runs as some will have a blue run yet in another resort it could be deemed a red run. The best thing to do if you are unsure and not completely comfortable with the more difficult runs is to ask the tourist office for advice. They will be able to help you assess what runs suit you. Make sure you head to your local slope before your trip for a practice to make sure you're ready.
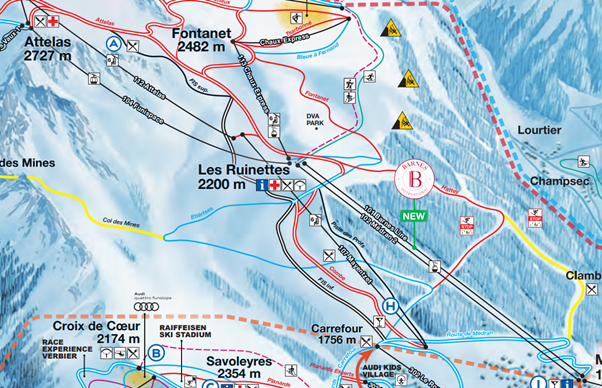
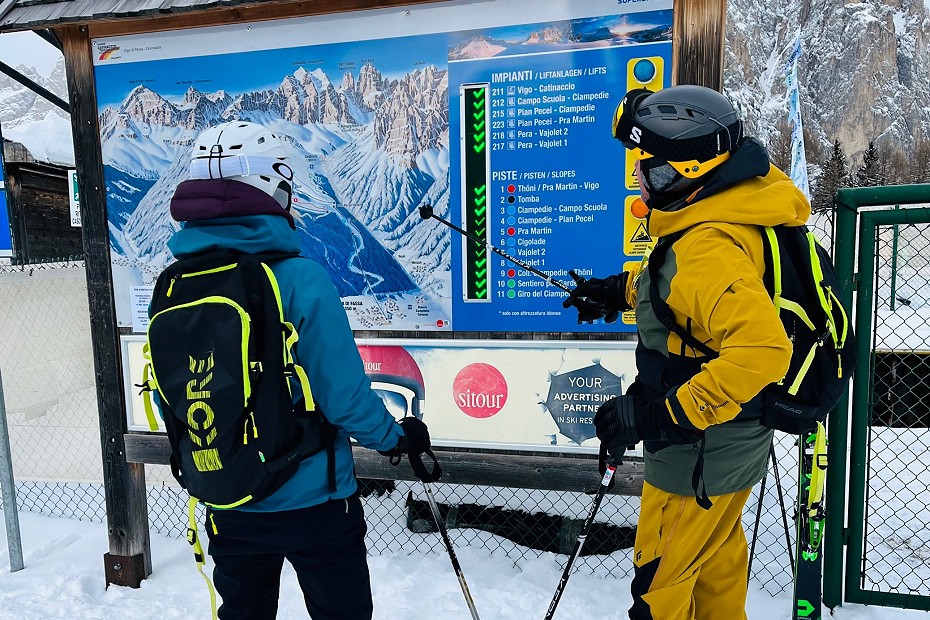
All lifts will be a solid black line on a map and will have symbols to show what type it is: gondola, chair, t-bar etc. All lifts will have a name so it is easier to know where you are and which lift you want to take.
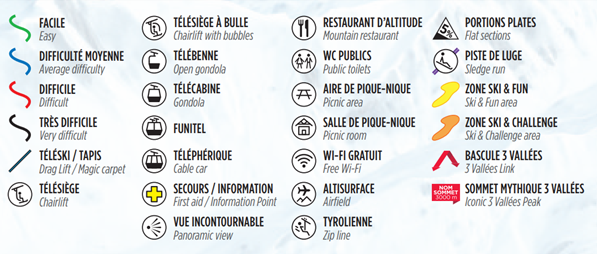
There will be a key somewhere on the map like the image above which will explain what each symbol means in more detail. Understanding what each symbol means will help you if you are looking for something in particular. Hopefully you won’t need first aid on your trip but it is definitely worth checking the map for where their stations are in case you or someone on your trip gets injured.
Keeping you safe:
Make sure you check what your Lift Pass covers. Different ski resorts will offer lift passes for certain areas, make sure you know what your lift pass covers as you might end up skiing down a run into a section of the mountain that your pass does not cover and this can leave you stranded.
It is important to plan your route home so you don’t get caught by lifts closing. A big mistake that some people make is not keeping an eye on the time or thinking they can get back quicker than is possible. All lifts will have their closing time at the bottom of them so it is worth making a mental note of this when planning your route home so you don’t get caught out by the lifts closing. Make sure you are aware of alternative ways home in case this happens – there are shuttle busses and trains in some resorts. Some resorts might require you to carry identification as you might be crossing boarders depending on the resort you are at!
What do the altitudes mean? Do I need to know about this?
It is not completely necessary to know what altitude you are at, it is something some people might find interesting. Altitude is measured from sea level, it can be useful to know how high you are as some people suffer from altitude sickness so knowing what height you are at is a way to keep track of this.